Using the VALDI API
A public API is accessible to VALDI customers that enables programmatic provisioning, management, and termination of Virtual Machines, among other services as outlined below.
Authentication
VALDI's API is authenticated using API keys. Once you've created your API key through the VALDI dashboard, you can
authenticate your API requests by simply including the key under the X-API-Key header.
Obtaining the API Key
You can generate an API key in the VALDI Dashboard by navigating to Security & Keys → API Keys. Once created, be sure to download or copy the key, as it will only be shown once. For security purposes, API keys cannot be retrieved if lost.
If needed, you can generate multiple API keys for different purposes. It is highly recommended to regularly rotate keys and to delete keys that are no longer needed.
Authenticating with API Keys
To authenticate API requests, simply include the API key as an X-API-Key header:
X-API-Key: {your_api_key}
Virtual Machines (VM)
Fetch available devices
To see the list of available VALDI devices and configurations across all of our different providers, use the following API call.
GET https://api.valdi.ai/v2/devices/available
An example 200 OK response is:
{
  "devices": [
    {
      "engine": "Honeybadger",
      "cpu_type": "x86_64",
      "cpu_core_count": 14,
      "main_ram": 657,
      "gpu_enabled": true,
      "gpu_ram": 80,
      "gpu_type": "H100 SXM5 80GB",
      "gpu_code": "h100-sxm5-80gb",
      "gpu_count": 4,
      "location": "Seattle, Washington, United States",
      "storage": 45750,
      "hostnode": "5b59074a-9a02-4aea-81d0-ce3f0f636bdd",
      "cpu_cost": 0.0035,
      "ram_cost": 0.0025,
      "storage_cost": 0.0001,
      "gpu_cost": "2.3581500000000000",
      "available_port": [],
      "max_vcpus_per_gpu": 78,
      "max_ram_per_gpu": 696,
      "max_storage_gb": 45750,
      "max_vcpus": 14,
      "max_ram_gb": 657,
      "available_images": [
        "ubuntu2204",
        "ubuntu2404"
      ],
      "provider_id": "9d94f16f-dd42-4b1e-8a40-2499a5b1d24c"
    },
    {
      "engine": "Narwhal",
      "cpu_type": "x86_64",
      "cpu_core_count": 112,
      "main_ram": 439,
      "gpu_enabled": true,
      "gpu_ram": 80,
      "gpu_type": "A100 SXM4 80GB",
      "gpu_code": "a100-sxm4-80gb",
      "gpu_count": 3,
      "location": "Prague, Prague, Czech Republic",
      "storage": 3450,
      "hostnode": "a2d04e3d-59d5-4610-830c-cd93a53565d1",
      "cpu_cost": 0.0035,
      "ram_cost": 0.0025,
      "storage_cost": 0.0001,
      "gpu_cost": "1.035000000000000000000000000",
      "available_port": [
        10408,
        10409,
        10411,
        10414
      ],
      "max_vcpus_per_gpu": 96,
      "max_ram_per_gpu": 377,
      "max_storage_gb": 3450,
      "max_vcpus": 112,
      "max_ram_gb": 439,
      "available_images": [
        "ubuntu2204",
        "ubuntu2404"
      ],
      "provider_id": "9d94f16f-dd42-4b1e-8a40-2499a5b1d24c"
    }
    {
      "configuration": "H100_80GB_SXM_8x",
      "cluster": "Hou1",
      "rpool": "on-demand",
      "price": 19.32,
      "count": 0,
      "maxCount": 0,
      "os_version": "deprecated",
      "os_type": "deprecated",
      "storage": 20000,
      "gpu_type": "nvidia.com/H100SXM480GB",
      "gpu_family": "NVIDIA H100",
      "gpu_brand": "NVIDIA®",
      "gpu_name": "H100 80GB SXM",
      "type": "nvidia.com/H100SXM480GB",
      "brand_family": "NVIDIA H100",
      "brand": "Nvidia",
      "gpus": 8,
      "vcpus": 200,
      "memory": 940,
      "compute_network": "3200G InfiniBand",
      "is_gpu_platform": true,
      "running_cost": "19.32000000000000000000000000",
      "location": "Houston, Texas, United States",
      "available_images": null,
      "provider_id": "1f35c13d-5a73-456f-b7d9-804fc483e0f0"
    },
    {
      "data_center_id": "no-kristiansand-1",
      "machine_type": "sapphire-rapids-h100",
      "cpu_type": "host-passthrough",
      "gpu_type": "H100 SXM SXM5 80GB",
      "gpu_code": "nvidia-h100",
      "cpu_core_count": "114",
      "main_ram": "1543",
      "gpu_count": "3",
      "storage": "378060",
      "cpu_cost": 2.95e-06,
      "ram_cost": 2.45e-06,
      "storage_cost": 0.00028,
      "gpu_cost": 2.5875,
      "ip_cost": 0.004025,
      "location": "Norway",
      "total_cpu_core_count": "114",
      "total_main_ram": "1543",
      "total_gpu_count": "3",
      "total_storage": "378060",
      "min_vcpu_per_memory_gib": "0.0515873",
      "max_vcpu_per_memory_gib": "0.2063492",
      "min_vcpu_per_gpu": "1",
      "max_vcpu_per_gpu": "26",
      "min_vcpu": "0",
      "min_memory_gib": "0",
      "provider_id": "0a53cf4e-4f6f-4c85-a3cd-8f9160d0bce3"
    }
  ]
}
You will notice that the structure of and the key-value pairs included in each object vary depending on the
provider_id. This is a necessary result of the variability across different Data Center APIs and provisioning engines
and is ultimately a byproduct of the diverse inventory that VALDI offers.
Upload an SSH key
VALDI servers require SSH key authentication. You can either have VALDI generate an SSH key for you, or upload your own. When VALDI generates the key for you, we do not store the private key.
Generate an SSH key
NOTE: It is generally easier and faster to generate your SSH keys through the dashboard at cloud.valdi.ai.
To generate an SSH key, use the following endpoint.
POST https://api.valdi.ai/sshkeys/sshkey
This endpoint requires authentication. To authenticate, include the following header in the call:
X-API-Key: {your_api_key}
The format of the payload is very simple:
{
  "name": "whatever-you-want-to-name-the-key"
}
An example 201 Created response is:
{
  "private_key": "-----BEGIN RSA PRIVATE KEY-----\nMIIJKAIBAAKCAgEAvVslMAKcIKk4blv182E2Fh7oJOzvOfzgoenual92VvOG6WPB\n30SHs4+MXBf17Nei+PRUsZ4aYGodt1GIjz3sX/nUdLEdN1oIEYIEqZuMSD899LAh\nme9wBRqydbhhYJOTksbufAkBJNjJT9QkZDArVpvMQ1hqOwCRqpBMY4QsYwxdK3wN\nYr/moffJEXiHvY3XnpaIAPfX+KzO/vp7N01K3L5mugQDisgxXlk7TQn3Py3fJkiD...",
  "ssh_key_id": "your-new-ssh-key-uuid"
}
Remove new lines from private key
After copying and pasting the private key into a plain text file, you will need to manually remove new line characters
and replace them with actual new lines. One way to do this is by opening the file in vim (sorry emacs fans), entering
command mode by pressing :, and then running the following command:
:%s/\\n/\r/g
If you generate the SSH key in the dashboard, you don't have to deal with this. :)
Modify permissions of private key
The private key file should have the following permissions, or ssh may refuse to connect you.
-rw-------
To assign such permissions, use the following command:
chmod 600 {private_key_filename}
Please save both the private key and the SSH key ID. This is the only time you will be able to retrieve the private key, and the SSH key ID is needed to provision VMs that require SSH key authentication.
Upload your own SSH key
If you wish to upload your own key, simply add public_key to the API payload and specify your public key string as
the value. For example:
{
  "name": "whatever-you-want-to-name-the-key",
  "public_key": "ssh-rsa AAAAB3NzaC1yc2EAAAADAQABAAABgQDi58YPCsimrInlFjcdKokRG7pi4zn6meGEO/2ChLSKxYWnkOzv5sXWkYSvOBZxWNfxqPcHpRYVBEjxByMQ29Wo9LcDb5sNAPGHWKKsMrSsGI0VzDLA/EmtNQrsQhK9KHnHzJbgrUxNF3ItV5C0Omy6FfDI4waHcozyl4Hap9DMl97wSWZpLge+tXJwpQbjsJA5mpp35EwL8h3ZhKDAeid2zw1EIzip36nJhHASmhMzh4zBWMLQTAJHPd266bPakhih78fwLiCiV7+kf7lOjZnTUBGO6TjuqmgdSVYQT2GadsXmWUHHuhSytqboQ6q5TwjrVsGaLvWFg2+pg56DxxkdNblaVtQzl2l8INh0ucse65gEo3ZYf7SiozfO4vEt9SjR70GKCysXNytdeE241HmE14gECWlir97NeXLruLcETCbmncI3Ir7XMfQ/3Au8kDLH8hS+e5eVuyM9e9O4LzphQ+GnaFfc84JpzTQxlDaMEJ6yAC+7d9SVUZbvBGvIt8E="
}
Get SSH Keys
To get a list of the SSH keys under your account, use the following authenticated API.
GET https://api.valdi.ai/sshkeys
This endpoint requires authentication. To authenticate, include the following header in the call:
X-API-Key: {your_api_key}
An example 200 OK response is as follows.
{
  "ssh_keys": [
    {
      "name": "api-docs-key",
      "public_key": "ssh-rsa AAAAB3NzaC1yc2EAAAADAQABAAACAQC9WyUwApwgqThuW/XzYTYWHugk7O85/OCh6e5qX3ZW84bpY8HfRIezj4xcF/Xs16L49FSxnhpgah23UYiPPexf+dR0sR03WggRggSpm4xIPz30sCGZ73AFGrJ1uGFgk5OSxu58CQEk2MlP1CRkMCtWm8xDWGo7AJGqkExjhCxjDF0rfA1iv+ah98kReIe9jdeelogA99f4rM7++ns3TUrcvma6BAOKyDFeWTtNCfc/Ld8mSIPWCyxC+D3bmrIOm7re87oW01lanp7SSk1xU3P3hXNBsZRf1SkCjNXJIWEq3xp5WJDQYL4yy+J0FnahZC6o6LxeCkc/fEWfTV7yC4Cp7lBstCn9fiZyh2YAnFJd5FjD1JNThiWTw7KUB8qePbhZdxPfNJhMt3qRknMj2wRM6aDAQ68OSKMjUvJjDoJnr3jmlo4ZVvpcU2qRO73vJdrJDtwTCRUheDTXrSd0091JrQGN7qEsjj8BtC4NsPMuQpNJpUAVvCftBgjTD3OH892Ey8geDctLgI8HXoGhkIZNuRsmdL4SmWeH2nyWKRtnKpjiMTUi32Y6KV+Fs7ttvJZ5nG8x+SZ+4G2XfkeFXp/tRypiU7bYnYm5AQINXhSloaHsG/sztCaWyettQje5khNmnrHT/29XQB8vfcSHI3nnY/xkA9I5SN+fB2Vxcav69w==",
      "ssh_key_id": "02a18443-93d1-4c86-92f9-65f90d129a74",
      "created_at": "2023-12-12T23:13:54.285477"
    },
    {
      "name": "valdi-test-key",
      "public_key": "ssh-rsa AAAAB3NzaC1yc2EAAAADAQABAAACAQCXPGUW6PkZjDtOjNf4o9mqtkTTl2w2UCLelcsVDXS2Hh/pS28D6Jyq9JFeLxgusvJrcMA+xUfW7Jc5PiWlvsSzkiaHHDd+Qp38TluxXPiCLz/grLURC6jwQt39z3DMh4Yqrc3ybUdVr8ScD54h6dEw/OtDchdgqmjkdAWTCdlGxmpdw4lPPFuR0MoTVR9ebbwtKxlB2eXk6+voNIYykLdlVxia71xpuVdaBBSI2c59fDK7KsGqkQw7xv31gE3RKc3Z663ieOB3sSClU9FFaixBplrqa2kU8Cb3c5zcmM7VXQiR2rVKSvIdFgIbHdIaEnSn0D9vauNxhJMsONxbVSY2+a6zx+tJ4FR25qsBWkCUwxe2vlMVeoR4kppk11XPiVQBVWPI+Pkygzh0PhrpCqrPz30m9Ue7Oug5SueCefJtrb3GBId2sCuAhiVxQETvUG0873D/TpMI+4mL4tmsNb/RgrxE7kAOAji+bJUaYORmLbJuY98VRJlECJsKHUn52VX9HpA2Vnpfo1RNcnUnMBUzDmh1kqBzzi8mx3c0xL/JQozqtNVuwDg9dAy79CNdU6+nwQdAqvYLU11v68x1i8XssA8b+rRJWzZ2W7QBXssIyPPvsvP1F8Na+8yBam9+XO1nyjL4i4XzmMCcddJJ/edb1xk0Lbrehh5J1LWTPHXVWQ==",
      "ssh_key_id": "708bffd3-bce7-4806-aa55-cbaa9a3740b9",
      "created_at": "2023-11-30T22:57:53.425409"
    }
  ]
}
Notice that the private keys are not returned. VALDI does not store your private key, so you need to make sure to save it when you first create it.
Provision a VM
POST https://api.valdi.ai/v1/vm/provision
This endpoint requires authentication. To authenticate, include the following header in the call:
X-API-Key: {your_api_key}
The format of the payload is as follows:
{
  "provider_id": "provider_id_from_available_devices_api",
  "user_provided_name": "whatever-name-you-want",
  "details": PROVIDER-SPECIFIC OBJECT (SEE BELOW)
}
As described below, the format of the details object varies depending on the provider.
Unless otherwise noted, the default username for VMs is ubuntu.
Provider ID 1f35c13d
An example details object for this provider is shown below.
{
  "configuration": "A40_46GB_PCIe_1x",
  "cluster": "Msc1",
  "rpool": "on-demand",
  "operating_system": "nvidia-550-pcie",  // replace pcie with sxm where applicable
  "ssh_key_id": "02a18443-93d1-4c86-92f9-65f90d129a74"
}
The definitions of the various fields are:
configuration: The configuration code string as returned byGET /v2/devices/availablecluster: The cluster code string as returned byGET /v2/devices/availablerpool: The resource pool code string as returned byGET /v2/devices/available(typically alwayson-demand)operating_system: Eithernvidia-550-sxmornvidia-550-pciedepending on whether the specified configuration has SXM or notssh_key_id: The UUID of the SSH key you would like to use to access the VM
Provider ID 0a53cf4e
Default Username
The default username for VMs provisioned with this provider is root.
An example details object for this provider is shown below.
{
  "data_center_id": "ca-montreal-3",
  "machine_type": "sapphire-rapids-h100",
  "ssh_key_id": "02a18443-93d1-4c86-92f9-65f90d129a74",
  "boot_disk_size": 128,
  "vcpus": 4,
  "ram": 8,
  "gpu_count": 2
}
The definitions of the various fields are:
data_center_id: The code string identifying the data center where the server is located as returned byGET /v2/devices/availablemachine_type: The code string identifying the type of server you wish to provision as returned byGET /v2/devices/availablessh_key_id: The UUID of the SSH key you would like to use to access the VMboot_disk_size: The integer size, in GiB, of the system drivevcpus: The desired integer number of vCPUsram: The desired integer amount of RAM in GiBgpu_count: The desired integer number of GPUs
When provisioning a VM from this provider, restrictions on the minimum and maximum number of vCPUs per GiB RAM and per
number of GPUs has to be honored. These restrictions are returned in the following fields of a given response item from
the GET /v2/devices/available call:
min_vcpu_per_memory_gib: The minimum number of vCPUs you can allocate per GiB of RAMmax_vcpus_per_memory_gib: The maximum number of vCPUs you can allocate per GiB of RAMmin_vcpu_per_gpu: The minimum number of vCPUs you can allocate per GPUmax_vcpu_per_gpu: The maximum number of vCPUs you can allocate per GPU
Notes that this provider uses GiB rather than GB.
Provider ID 9d94f16f
Default Username
The default username for VMs provisioned with this provider is user.
Narwhal engine
An example details object for this provider's devices using the Narwhal engine is shown below:
{
  "gpu_model": "a100-pcie-80gb",
  "operating_system": "ubuntu2404",
  "external_ports": "{21299}",
  "internal_ports": "{22}",
  "gpu_count": 1,
  "ssh_key_id": "02a18443-93d1-4c86-92f9-65f90d129a74",
  "hostnode": "b2ce5479-fa59-483f-86ba-0aa128051821",
  "storage": 250,
  "vcpus": 64,
  "ram": 128
}
The definitions of the various fields are:
gpu_model: The desired GPU model as returned byGET /v2/devices/availableundergpu_codeoperating_system: Any of the options listed underavailable_imagesexternal_ports: A list of external ports you want to be exposed (e.g.,{10408, 10409, 10411})internal_ports: A list of corresponding internal ports to which the external ports will map (.e.g,{22, 80, 443})- This would map 10408 to 22, 10409 to 80, and 10411 to 443
gpu_count: The number of GPUs you want to attach to the VMssh_key_id: The UUID of the SSH key you would like to use to access this machinehostnode: The UUID of the hostnode as returned byGET /v2/devices/availablestorage: The desired amount of storage in GB (must be at least 100 and a multiple of 10)vcpus: The desired number of vCPUs (must be an even number)ram: The desired amount of RAM in GB
A full example payload for provider ID 9d94f16f-dd42-4b1e-8a40-2499a5b1d24c is as follows.
{
  "provider_id": "9d94f16f-dd42-4b1e-8a40-2499a5b1d24c",
  "user_provided_name": "whatever-name-you-want",
  "details": {
    "gpu_model": "a100-pcie-80gb",
    "operating_system": "ubuntu2404",
    "external_ports": "{21299}",
    "internal_ports": "{22}",
    "gpu_count": 1,
    "ssh_key_id": "02a18443-93d1-4c86-92f9-65f90d129a74",
    "hostnode": "b2ce5479-fa59-483f-86ba-0aa128051821",
    "storage": 250,
    "vcpus": 64,
    "ram": 128
}
}
Honeybadger engine
For nodes using the Honeybadger engine, simply remove the internal_ports and external_ports key-value pairs from
the details dictionary in the provisioning payload. The Honeybadger-powered nodes offer dedicated IPs by default, so
all ports are mapped 1-to-1. Port access can be managed after VM provisioning using ufw.
Provider ID a45088e0
An example details object for this provider is shown below.
{
  "flavor_id": "94d76997-44ec-4f1e-8291-231de42b6030",
  "ssh_key_id": "02a18443-93d1-4c86-92f9-65f90d129a74",
  "ipv4": true
}
The definitions of the three fields are:
flavor_id: The UUID of the desired server configuration as returned byGET /v2/devices/availablessh_key_id: The UUID of the SSH key you would like to use to access this machineipv4: Specifies whether you want an IPv4 address allocated to this VM. If false or left out, the VM will only receive an IPv6 address.
A full example payload for provider ID a45088e0-1681-446e-9a3e-3ed9dfc3d57e is as follows.
{
  "provider_id": "a45088e0-1681-446e-9a3e-3ed9dfc3d57e",
  "user_provided_name": "whatever-name-you-want",
  "details": {
    "flavor_id": "94d76997-44ec-4f1e-8291-231de42b6030",
    "ssh_key_id": "02a18443-93d1-4c86-92f9-65f90d129a74",
    "ipv4": true
  }
}
These VMs have ports 80, 443, and 22 open by default. Other ports can be configured using ufw once logged in.
Provider ID bd3731eb
An example details object for this provider is shown below.
{
  "image_id": "2cd0e25f-a39e-4bc6-aa78-b4c40b87072a",
  "ssh_key_id": "02a18443-93d1-4c86-92f9-65f90d129a74",
  "config": "vcpu-32_memory-192g_nvidia-rtx-3090-8",
  "sec_group_rules": [
    {
      "protocol": "tcp",
      "port_range_min": 22,
      "port_range_max": 22,
      "direction": "ingress"
    }
  ],
  "additional_storage": 128
}
The definitions of the fields are:
image_id: The UUID of the image which can be retrieved from theavailable_imageslist in the response ofGET /v2/devices/available/{provider_id}/{shape_id}ssh_key_id: The UUID of the SSH key you would like to use to access this machineconfig: Theshape_codefrom the response ofGET /v2/devices/availableadditional_storage: Optional parameter specifying the size, in GB, of an additional storage volume to attach to your VM (these are different from VALDI detachable storage volumes)sec_group_rules: The security group (firewall) rules you would like applied to this deployment
Security group rule format
The security group rules are a list of objects with the following format:
{
  "protocol": "tcp",
  "port_range_min": "lowest-port-number-for-security-group-rule-range",
  "port_range_max": "highest-port-number-for-security-group-rule-range",
  "direction": "ingress"
}
If you only want the rule to open a single port, set port_range_min and port_range_max to the same value. The values
of protocol and direction need not change.
A full example payload for provider ID bd3731eb-37c7-4577-817e-b8fe9dd02dfd is as follows.
{
  "provider_id": "bd3731eb-37c7-4577-817e-b8fe9dd02dfd",
  "user_provided_name": "whatever-name-you-want",
  "details": {
    "image_id": "2cd0e25f-a39e-4bc6-aa78-b4c40b87072a",
    "ssh_key_id": "02a18443-93d1-4c86-92f9-65f90d129a74",
    "config": "vcpu-32_memory-192g_nvidia-rtx-3090-8",
    "sec_group_rules": [
      {
        "protocol": "tcp",
        "port_range_min": 22,
        "port_range_max": 22,
        "direction": "ingress"
      }
    ],
    "additional_storage": 128
}
}
Provider ID 290ff5d9
An example details object for this provider is shown below.
{
  "region": "nyc2",
  "size": "gpu-h100x1-80gb",
  "image": "191457505",
  "ssh_key_id": "02a18443-93d1-4c86-92f9-65f90d129a74"
}
The definitions of the four fields are:
region: The region code as returned byGET /v2/devices/availablesize: The GPU-type slug as returned byGET /v2/devices/availableimage: The image ID of the base image you wish to use from the list of available images as returned byGET /v2/devices/availablessh_key_id: The UUID of the SSH key you would like to use to access this machine
A full example payload for provider ID 290ff5d9-16d6-41cc-9b76-c9514e4c1922 is as follows.
{
  "provider_id": "290ff5d9-16d6-41cc-9b76-c9514e4c1922",
  "user_provided_name": "whatever-name-you-want",
  "details": {
    "region": "nyc2",
    "size": "gpu-h100x1-80gb",
    "image": "191457505",
    "ssh_key_id": "02a18443-93d1-4c86-92f9-65f90d129a74"
  }
}
Please remember that VMs can take up to 15 minutes to provision, especially for large RAM deployments. If you are getting a "Connection refused" error from ssh, it is best to wait a bit longer and try again.
Get VM status
You can retrieve the full list of your virtual machines with the following authenticated call.
GET https://api.valdi.ai/v1/vm
This endpoint requires authentication. To authenticate, include the following header in the call:
X-API-Key: {your_api_key}
An example 200 OK response is:
{
  "virtual_machines": [
    {
      "server": "5bebf874-05d9-49d7-a45f-801a702ac27c",
      "ip": "2a0b:d40:0:4c::1",
      "provider_id": "a45088e0-1681-446e-9a3e-3ed9dfc3d57e",
      "ssh_key_id": "02a18443-93d1-4c86-92f9-65f90d129a74",
      "name": "valdi-customer-Vlj!%k",
      "user_provided_name": "api-docs-test",
      "gpu_count": 1,
      "gpu_model": "RTXA6000.1GPU",
      "pretty_gpu_name": "RTX A6000 48GB",
      "vcpus": 6,
      "ram": 55,
      "storage": 500,
      "operating_system": "Ubuntu 20.04 LTS",
      "port_forwards": "{\"22\": \"22\", \"443\": \"443\", \"80\": \"80\"}",
      "all_inclusive": true,
      "cpu_cost": null,
      "ram_cost": null,
      "storage_cost": null,
      "gpu_cost": null,
      "all_inclusive_running_cost": "0.830000000000",
      "all_inclusive_stopped_cost": "0.130000000000",
      "last_stopped_time": null,
      "last_restarted_time": null,
      "created_at": "2023-12-12T23:41:05.232767",
      "status": "running"
    },
    {
      "server": "52703e5e-347a-47af-bdf4-1ac8fbb9942e",
      "ip": "217.79.242.232",
      "provider_id": "66730e5d-98d2-45f6-8aaa-6ad8cdcbc285",
      "ssh_key_id": null,
      "name": "valdi-customer-li03lg",
      "user_provided_name": "api-docs-test",
      "gpu_count": 1,
      "gpu_model": "v100-pcie-16gb",
      "pretty_gpu_name": "V100 16GB",
      "vcpus": 2,
      "ram": 4,
      "storage": 20,
      "operating_system": "Ubuntu 20.04 LTS",
      "port_forwards": "{\"60000\": \"22\"}",
      "all_inclusive": false,
      "cpu_cost": "0.003500000000",
      "ram_cost": "0.002500000000",
      "storage_cost": "0.000100000000",
      "gpu_cost": "0.292000000000",
      "all_inclusive_running_cost": null,
      "all_inclusive_stopped_cost": null,
      "last_stopped_time": null,
      "last_restarted_time": null,
      "created_at": "2023-12-12T23:40:28.217619",
      "status": "running"
    }
  ]
}
Note that different fields are null depending on the provider.
You can get the status of specific VMs by appending the VM ID to the path of the GET call. For example,
GET /v1/vm/52703e5e-347a-47af-bdf4-1ac8fbb9942e would return only the second entry in the list above.
Stop a VM
To stop (i.e., temporarily turn off) your VM but retain your locally stored data, use the following authenticated endpoint.
POST https://api.valdi.ai/v1/vm/stop/{server_id}
This endpoint requires authentication. To authenticate, include the following header in the call:
X-API-Key: {your_api_key}
Upon success, you will get the following 200 OK response:
{
    "message": "success"
}
For VMs from Provider ID a45088e0, the cost of the VM while stopped will be 13-16% of the cost while running. Your data will be retained, and you can restart the VM at any time.
For VMs from Provider ID 66730e5d, you will only pay for the amount of storage you assigned to the VM. Your data will be retained, but you are not guaranteed to be able to restart the VM at any time. (If all GPUs attached to your physical server are rented out while your VM is stopped, you will have to wait until at least one GPU becomes available again.)
Start a VM
To start a VM that had been stopped, use the following authenticated endpoint.
POST https://api.valdi.ai/v1/vm/start/{server_id}
This endpoint requires authentication. To authenticate, include the following header in the call:
X-API-Key: {your_api_key}
Upon success, you will get the following 200 OK response:
{
  "message": "success"
}
It may take a few minutes for your VM to come online and be accessible again.
Terminate a VM
To permanently delete a VM, use the following command. The VM can be either in a running or stopped state.
POST https://api.valdi.ai/v1/vm/destroy/{server_id}
This endpoint requires authentication. To authenticate, include the following header in the call:
X-API-Key: {your_api_key}
Upon success, you will get the following 200 OK response:
{
  "message": "success"
}
Templates
Templates enable you to write code to be executed automatically upon provisioning a VM. This is useful for things like preinstalling software libraries, downloading data or other assets, setting configuration variables, or any other repetitive tasks that can be programmatically automated. Templates use cloud-init under the hood.
A template is VALDI parlance for a YAML-formatted cloud-init script. Theoretically, anything you can do with a cloud-init script (which is a lot!), you can do with a VALDI template. Generally, the workflow is as follows:
- Write your cloud-init template locally.
- Upload the template via API to your VALDI account.
- When provisioning a VM, specify the template ID in the payload.
How to structure your template
There are two approaches to structuring the template:
- Include all the commands you want to execute in the cloud-init template itself (fine for most basic operations).
- Write a bash (or otherwise) script to handle more complex logic and simply use the cloud-init template to download the bash script and run it.
For anything but the most basic of operations, the second approach is recommended (and also avoids you having to learn extensive cloud-init syntax), so that's what we'll demonstrate. With that said, cloud-init is very powerful on its own, and if you are interested in doing some heavy lifting within the template itself, check out some examples of use cases here.
Write a script
In this example, we'll use a bash script, since it's able to run natively very easily, but you can use whatever scripting language you are most comfortable with.
Suppose we want to download a machine learning dataset from the internet so that it's always present on new VMs that we provision. Here's a bash script which checks for the existence of the dataset, and downloads it if it's not already there.
#!/bin/bash

# Check if the dataset file already exists in the user's home directory
if [ ! -f "$HOME/iris.csv" ]; then
    # Download the Iris dataset from UCI Machine Learning Repository and save it as iris.csv
    wget -O "$HOME/iris.csv" https://archive.ics.uci.edu/ml/machine-learning-databases/iris/iris.data
fi
Note: Templates may "unexpectedly" execute more than once (like after a reboot), so it's important to make your script idempotent (e.g., don't overwrite files or reinstall programs that have already been downloaded or installed—and potentially modified—by downloading or installing them again).
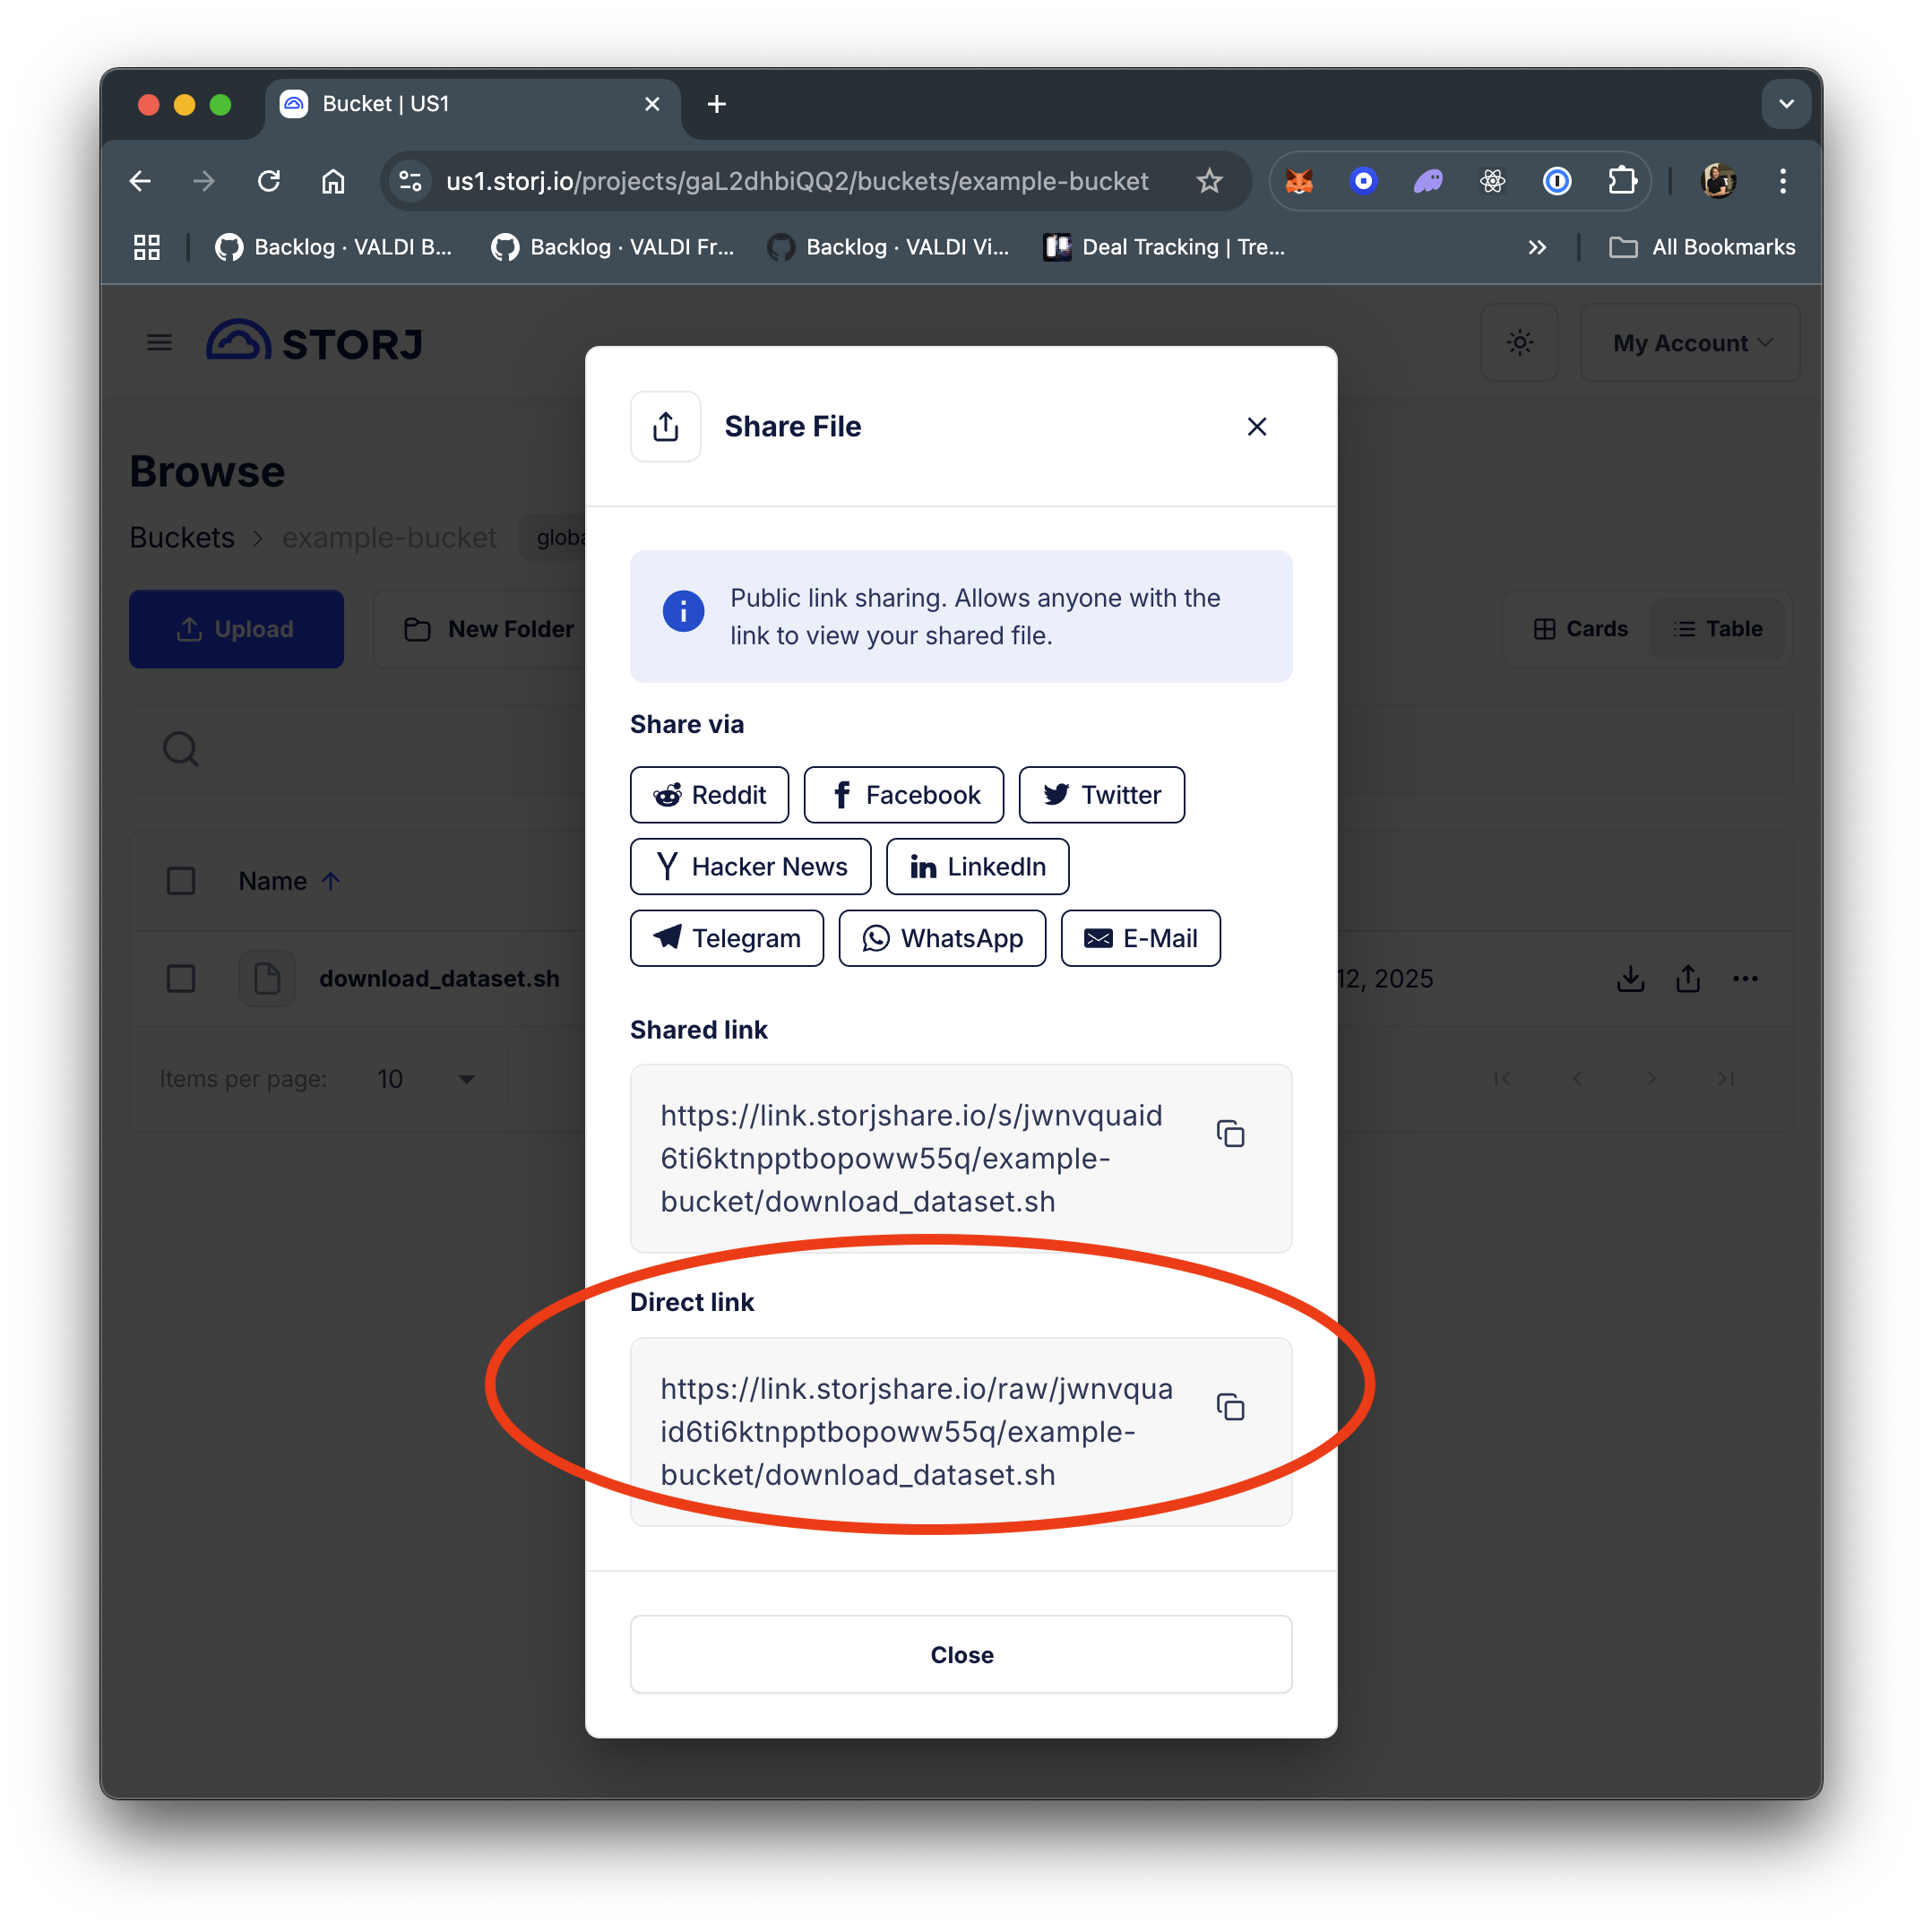
Upload the script to cloud storage
Once you've written your script, you have to make it available to be downloaded onto new VMs that you spin up. One option is to use a Storj public direct link, as shown below. (You'll want to use the "Direct Download Link" instead of the default "Interactive Preview Link".)
Create a template
The next step is to create the YAML template that will download the bash script and execute it. Here it is:
#cloud-config
packages:
  - curl
runcmd:
  - curl -s https://link.storjshare.io/raw/jw2ddgt4zfjjrgdvdekxij55fgwq/example-bucket/download_dataset.sh -o /tmp/download_dataset.sh
  - chmod +x /tmp/download_dataset.sh
  - sudo /tmp/download_dataset.sh
Some notes:
- The
packagessection of the template installscurlif it's not already present, more details here. - The
runcmdexecutes arbitrary commands after the packages are installed, more details here. - If you want to run additional commands, simply add more dashed items to the
runcmd:section. They are executed in order.
Upload the template
Use the POST https://api.valdi.ai/template API to upload a template. The payload is form-data:
| Key | Type | Value |
|---|---|---|
| name | Text | A name for your template (required) |
| description | Text | Text description of what your template does (optional) |
| template_file | File | Your actual template YAML file (required) |
As usual, you also need to include your API key as a header:
X-API-Key: {your_api_key}
Refer to Authentication for instructions on how to generate an API key.
An example HTTP 201 Created response is as follows:
{
    "organization_id": null,
    "user_id": 60,
    "name": "Download dataset",
    "description": "Simple script to demonstrate downloading a dataset from a public Storj link",
    "public": false,
    "template_id": "6b657784-24fe-49db-8cc7-a0500c056163",
    "created_at": "2025-03-12T23:20:07.170795"
}
You'll use this template_id in future deployments.
Deploy a VM using the template
As noted earlier, only VMs from Provider 0a53cf4e currently support templates. Choose a server from this provider from
GET /v1/devices/available or GET /v2/devices/available (both have the same content, just organized differently) on
which you'd like to deploy a VM. Here's an example payload for POST /v1/vm/provision that specifies the template we
created above:
{
    "provider_id": "0a53cf4e-4f6f-4c85-a3cd-8f9160d0bce3",
    "user_provided_name": "template-testing",
    "ssh_key_ids": ["02a18443-93d1-4c86-92f9-65f90d129a74"],
    "details": {
        "data_center_id": "no-kristiansand-1",
        "machine_type": "epyc-genoa-a100-pcie",
        "boot_disk_size": 80,
        "vcpus": 16,
        "ram": 16,
        "gpu_count": 1,
        "template_id": "bddb7328-79eb-4fc9-9b83-6f60ffcf15f9"
    }
}
In this case, we get the following 200 OK response:
{
    "server": "vee66f2d7-90b1-4683-a9d3-4d2da9fda0bd",
    "name": null,
    "ip": null,
    "process_id": "b9744a70-8ec1-4258-b970-31f3c53e860a"
}
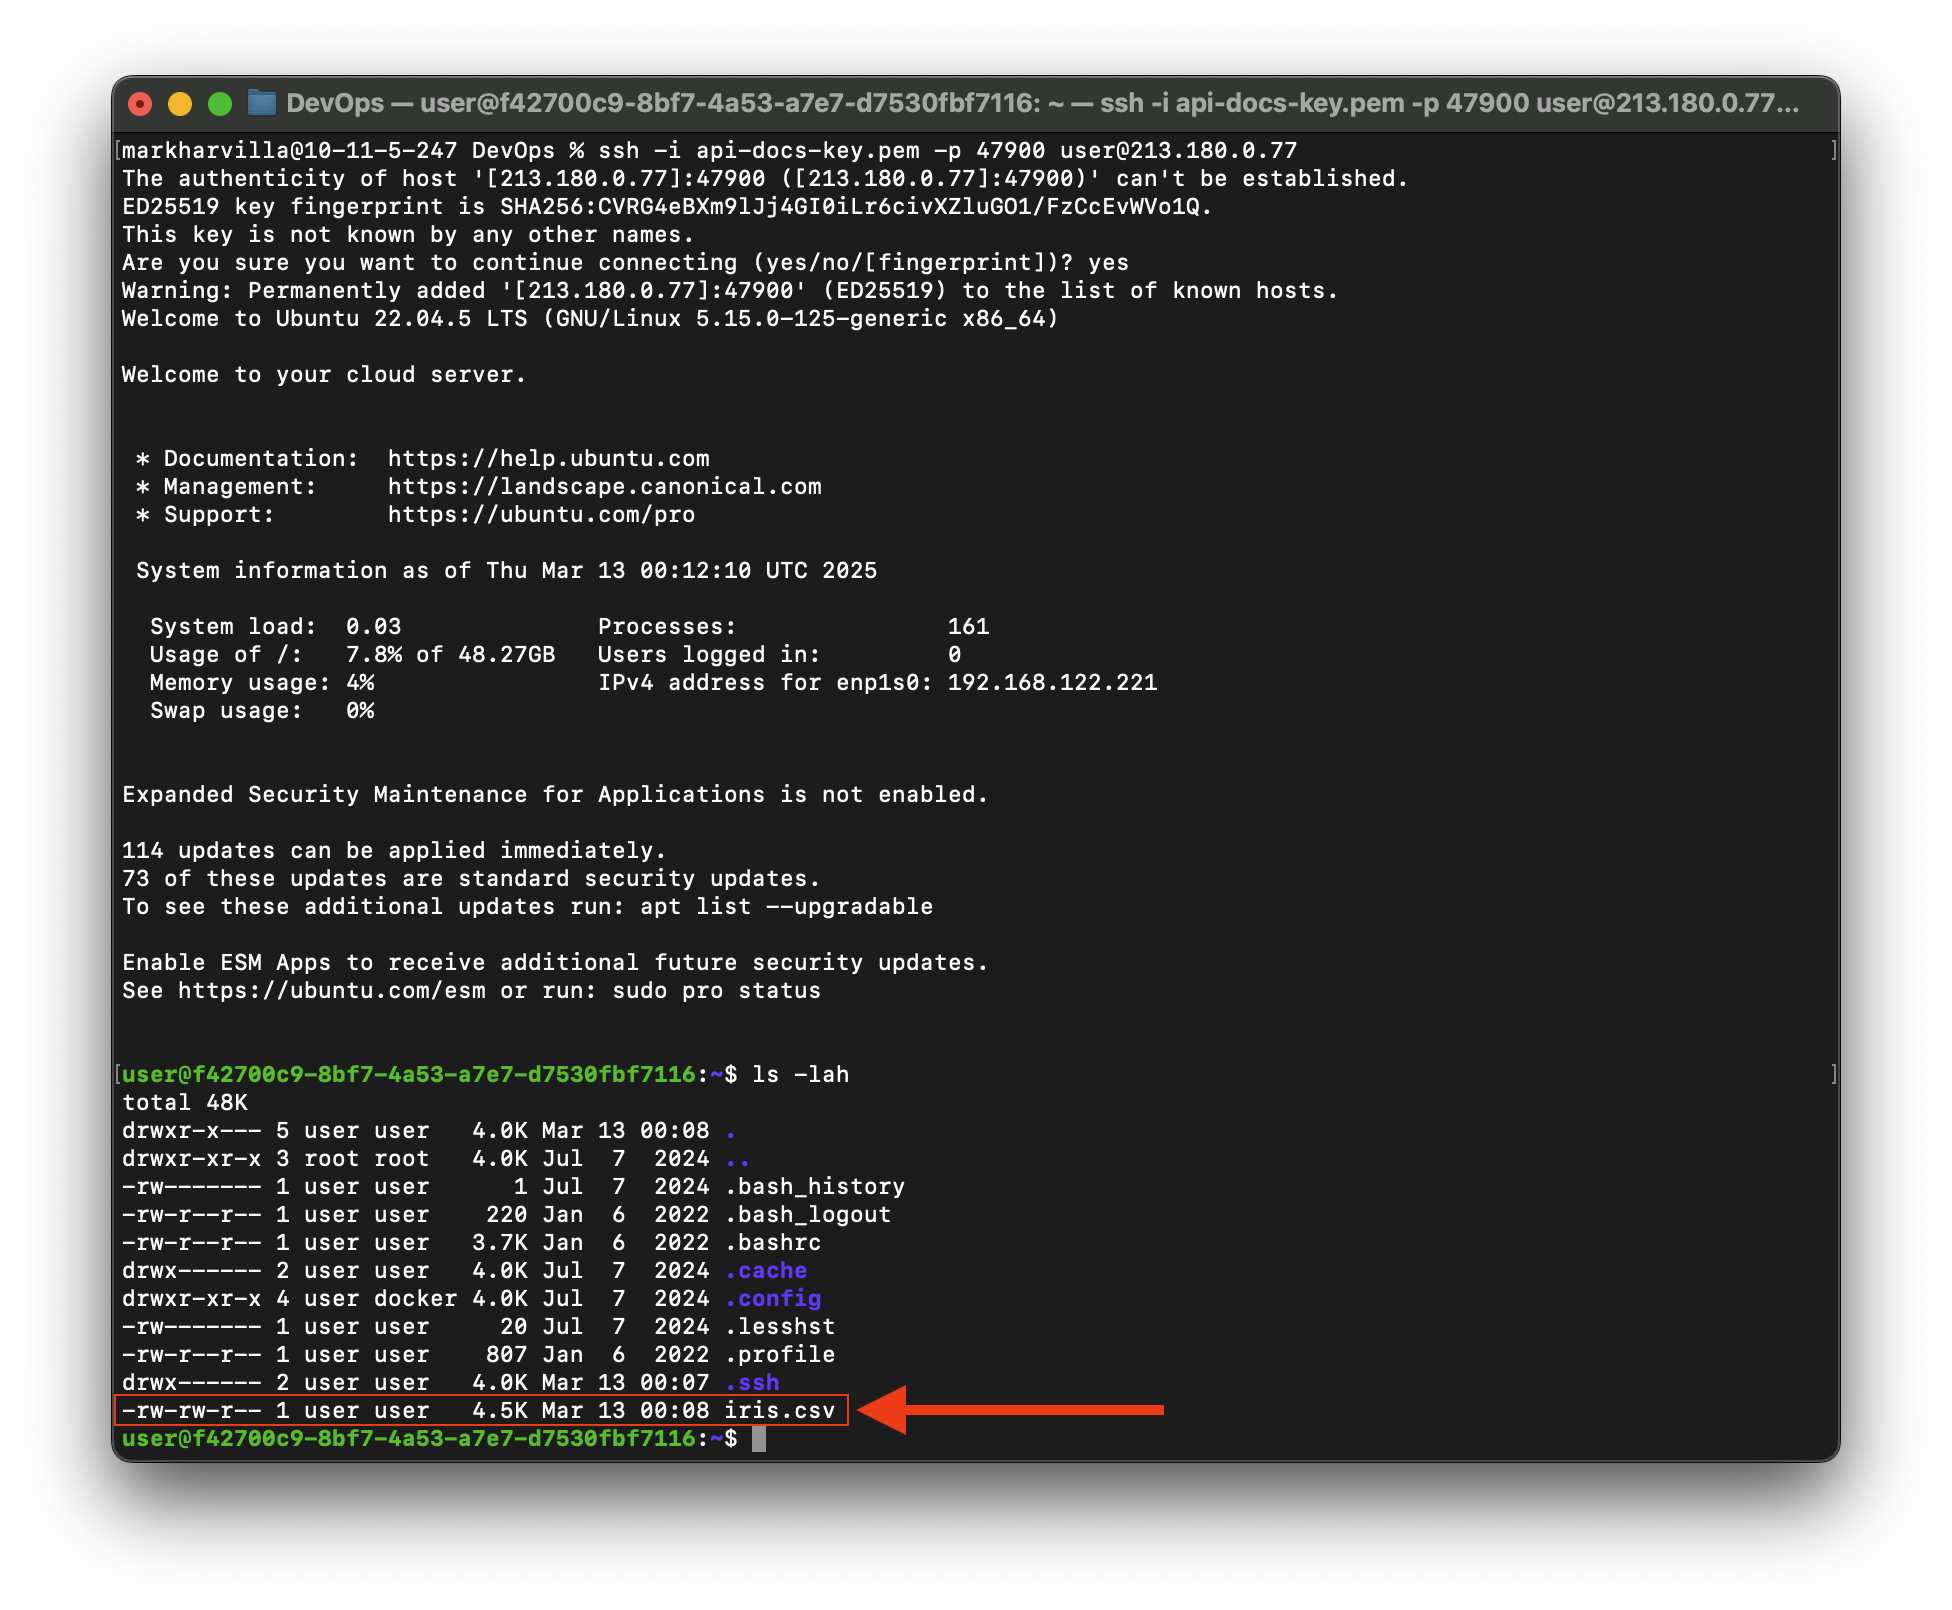
After waiting a few minutes for the VM to become accessible, we can log in and see that our dataset has successfully been downloaded and is ready to use!
You can reuse this same template as many times as you'd like in future deployments simply by specifying the Template ID in the request payload.
Storage
Create a volume
POST https://api.valdi.ai/volume
This endpoint requires authentication. To authenticate, include the following header in the call:
X-API-Key: {your_api_key}
Refer to Authentication for instructions on how to generate an API key.
The format of the payload is as follows:
{
  "bucket_name": "your_bucket_name"
}
There are no restrictions on allowable characters in bucket names.
Upon success, you will receive a 200 OK response:
{
    "volume_id": "76b892fb-7c2a-335c-9456-63b952e0014d",
    "bucket_name": "valid bucket name",
    "access_key_id": "jyasso4pxvwt2qv5k6nn626vs3cb",
    "secret_access_key": "jyzrh9lsssyj761l2kbbdefjkb6hijklxsgoif4p2sbzswn2qt32o",
    "created_at": "2024-05-01T21:31:26.671080",
    "deleted_at": null,
    "contents": null
}
The access_key_id and secret_access_key should be safely stored.
Create a subdirectory
PUT https://api.valdi.ai/volume/{volume_id}/folder/{encoded_path}
This endpoint requires authentication. To authenticate, include the following header in the call:
X-API-Key: {your_api_key}
The encoded path is the Base64-encoding of the subdirectory you would like to create. As an example, you can generate a Base64-encoded string in Python as follows:
import base64
text_path = 'newsub1/newsub2'
encoded_path = base64.urlsafe_b64encode(text_path.encode()).decode()
In the above, encoded_path comes out as bmV3c3ViMS9uZXdzdWIy, and the query
PUT /volume/{volume_id}/folder/bmV3c3ViMS9uZXdzdWIy creates the subdirectories newsub1/newsub2.
List all volumes
GET https://api.valdi.ai/volume
with the Authorization header, as usual.
X-API-Key: {your_api_key}
Upon success, you will receive a 200 OK response with a list of your volumes similar to the following:
{
  "volumes": [
    {
      "volume_id": "f81bebd8-fe50-41bb-b146-10c7b950370e",
      "bucket_name": "valid bucket name",
      "access_key_id": null,
      "secret_access_key": null,
      "created_at": "2024-05-01T21:31:26.671080",
      "deleted_at": null,
      "contents": null
    },
    {
      "volume_id": "2345b858-fcbd-4e56-866a-0f2e0ead8fae",
      "bucket_name": "detachable-volume",
      "access_key_id": null,
      "secret_access_key": null,
      "created_at": "2024-01-22T21:55:33.166196",
      "deleted_at": null,
      "contents": null
    },
    {
      "volume_id": "3ef27d50-3f15-47c9-9788-6c55dfdd3b6a",
      "bucket_name": "mounting-test",
      "access_key_id": null,
      "secret_access_key": null,
      "created_at": "2024-01-20T00:35:18.015527",
      "deleted_at": null,
      "contents": null
    }
  ]
}
List specific volume
GET https://api.valdi.ai/volume/{volume_id}
This endpoint requires authentication. To authenticate, include the following header in the call:
X-API-Key: {your_api_key}
A successful response looks like a single entry from the volumes list response of GET /volume as shown above.
List specific volume contents
Include the query string parameter include_contents=True as, e.g., GET /volume/{volume_id}?include_contents=True to also retrieve
the bucket's contents in the response.
List subdirectory contents
To list the contents of a volume's subdirectory, include the query string parameter subdirs={subdir} as, e.g.,
GET /volume/{volume_id}?include_contents=True&subdirs={subdir} where subdir is the path to the target subdirectory.
Upload data
GET https://api.valdi.ai/volume/{volume_id}/upload/{encoded_filepath}
This endpoint requires authentication. To authenticate, include the following header in the call:
X-API-Key: {your_api_key}
The first step to uploading data is to generate a PUT URL for the file you would like to upload. The encoded_filepath
parameter is the Base64-encoded relative path (including the filename) of the file you are uploading. The Base64
encoding can be calculated as described above. Note that the target filename once
uploaded does not have to match the local name.
The response of the above endpoint will include a PUT URL similar to the following:
{
    "upload_link": "https://gateway.valdi.ai/valdi/22/some-volume/newsub1/somefile.data?AWSAccessKeyId=jbsg1kn6to3c2yvzta3ulfq2fsmq&Signature=fD7vsrfxYvb%2bzhHtJHJyb6bMcgw%3D&Expires=1714697322"
}
To upload the file, make a PUT request to the above URL specifying the following headers:
Accept: */*
Content-Type:
(Yes, the Content-Type header should be empty.) The file itself should be included in the PUT request as a binary
stream.
Download data
GET https://api.valdi.ai/volume/{volume_id}/object/{encoded_filepath}
This endpoint requires authentication. To authenticate, include the following header in the call:
X-API-Key: {your_api_key}
The first step to downloading data is to generate a download link with the above GET request. As before, the
encoded_filepath parameter is the Base64-encoded relative filepath of the file you would like to download. See
here for how to Base64 encode a string.
The response will be like the following:
{
    "download_link": "https://gateway.valdi.ai/valdi/22/some-volume/somefile.data?response-content-disposition=attachment&X-Amz-Algorithm=AWS4-HMAC-SHA256&X-Amz-Credential=iwrglkm4235c3bacta3ulfq2fznq%2F20240503%2Fus-west-2%2Fs3%2Faws4_request&X-Amz-Date=20240503T220110Z&X-Amz-Expires=3600&X-Amz-SignedHeaders=host&X-Amz-Signature=2f4185b33dber553e45c74dbbab8680d4bebffb710e74d629006c720ba913c32"
}
Following download_link will automatically download the file.
Delete a file or subdirectory
To delete a subdirectory, use the following endpoint:
DELETE https://api.valdi.ai/volume/{volume_id}/object/{encoded_path}?path_type=PRE
To delete a file, use the same endpoint but with path_type=OBJ:
DELETE https://api.valdi.ai/volume/{volume_id}/object/{encoded_path}?path_type=OBJ
In both cases, the encoded_path parameter can be computed as shown here.
Authentication header required as usual.
This endpoint requires authentication. To authenticate, include the following header in the call:
X-API-Key: {your_api_key}
Upon successful completion of either of the above requests, you will receive 200 OK:
{
    "message": "Successfully deleted"
}
Note that this action is irreversible.
Delete a volume
DELETE https://api.valdi.ai/volume/{volume_id}
This endpoint requires authentication. To authenticate, include the following header in the call:
X-API-Key: {your_api_key}
Authentication header required as usual. Upon success, you will receive 200 OK:
{
    "message": "Successfully deleted"
}
Note that this action is irreversible.